![]()
Orbit Front supports direct printing to a number of large format printers along with the standard Windows printer. When this feature is enabled all raster images are printed directly to the print controller instead of through the Windows print driver. This highly improves the speed of the printing operation. It also allows you to utilize some of the unique features of your printer.
This feature is enabled from the FileèPrinting Method menu clicking the model menu item. When selected a small checkmark will be displayed next to the menu item.
When setting up the printer, the combo box labeled Printer contains a list of all installed printers on your system. Please identify your printer by selecting this printer from the list. In the list you will find two special printers labeled “Multi Printer” and “Pool Printer”. These are useful if you have several printers of the same model installed on your system. Choose either “Multi Printer” or “Pool Printer”, hit the Advanced button and select all installed printers. They must all be of the same model.
If you use “Multi Printer” your print jobs will be distributed to the printers in a cyclic manner. This means that one printer can process one job, while you are sending the next job to the next printer. If you use the Pool Printer, Orbit Front will split up your print job between all printers. If you have 2 printers and you have a set of drawings and you want to print 8 copies of the entire set, then this method will request each of your 2 printers to print 4 copies. This will ensure that the job is finished in the fastest way possible.
Xerox 8825/8830
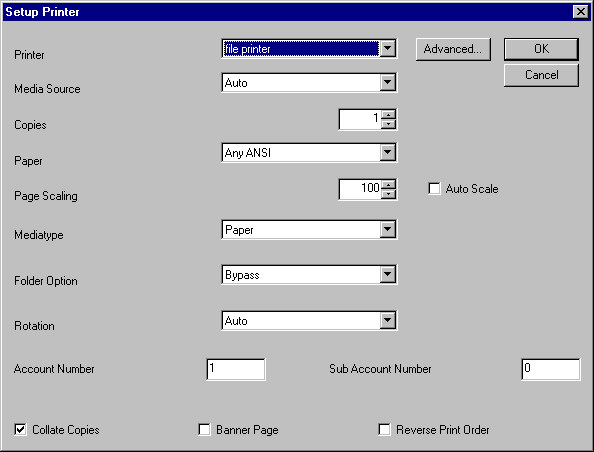
The screen shot displays the setup dialog for Orbit Front direct printing to Xerox 8825/8830.

With the Media Source setting you specify which roll or tray you want to use. With the Copies setting you can specify several copies. If you are printing sets of drawings and specify multiple copies, the Collate feature might be a good addition. The Paper setting specifies the size of your output. Your input can be scaled by use of the Page Scaling setting, or you can let the printer auto scale to the paper size specified by enabling “Auto Scale”. Set the Media Type to the specified medium. Folder Options can be specified but require installation of the folder device. In the Rotation combo box you can specify how to rotate your drawing or set it to Auto to let the printer decide. The printer will decide for a rotation that minimizes paper usage if set to Auto. If your printer requires account information, you will need to specify an “Account Number” and a “Sub Account Number”. If you enable Banner Page the printer will print a separator page before each print job. Enabling “Reverse Print Order” will reverse the print order.
Océ 9400
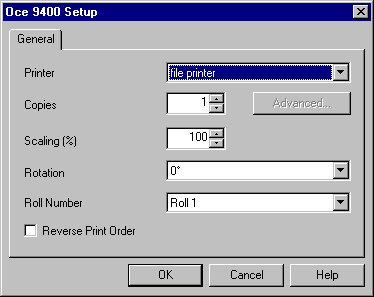
The screen shot displays the setup dialog for Orbit Front direct printing to Océ 9400.

With the Copies setting you can specify several copies. Your input can be scaled by use of the Scaling setting. In the Rotation combo box you can specify how to rotate your drawing. In the Roll Number combo box you can specify which paper roll to use for the print job. Enabling “Reverse Print Order” will reverse the print order.
Kip PowerPrint
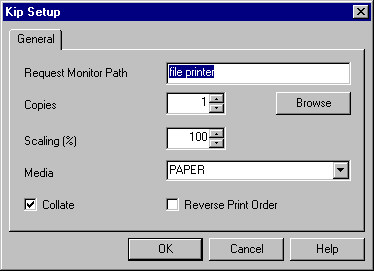
The screen shot displays the setup dialog for Orbit Front direct printing to the KIP PowerPrint server provided by KIP USA.

This printing method is used with the KIP PowerPrinter servers. The implementation complies with the US print servers, which are not identical to the ones sold in Europe or other regions.
In the Request Monitor Path you must specify the network location of the server you wish to print to. In Copies you specify the number of copies you need. The scale of the print must be specified in Scale (%) and the media in the Media setting. Collate copies as well as reverse print order can be enabled too.